Wednesday, June 9, 2021

The Undisputed Deep Dish Pizza Champion Of The World


The town of Platteville, Wisconsin, located about 25 miles NW of Dubuque, Iowa is home to the University of Wisconsin - Platteville, about 12,500 permanent residents and roughly that again in students, and the greatest deep dish pizza in the world.


Pizzeria Uno in Platteville has been serving up these pies since opening in 1976 and has a distant connection with the Chicago-based chain of the same name, but is wholly independent and has their own twist on the deep dish style that sets it apart and above all others.   It is one of those rare institutions which has not changed very much at all over the course of many decades.   Their wise choice in keeping up with the times was in buying up an adjacent building and turning it into 'The Annex" and in adding an outdoor bar as well.  The original place is nearly unchanged since my college days ended in the mid 1980's.   And the pizza...well it hasn't changed one bit.  Thankfully.

I have been on a quest to re-create the Platteville Uno's Deluxe, A La Mode with Wheat Crust since the mid-80's at home, and was mildly successful at it until I discovered the Real Deep Dish website, which unlocks several secrets of making a good deep dish pie.   That, combined with my personal research and a few tips, has enabled me to reach the point of about 98% success in recreating my all time favorite 'za.

And now, dear Reader, I pass that on to you.   You will need a 14" deep dish pan (about $20 on Amazon or check your local kitchen gadget specialist), a fine mesh strainer, some aluminum foil and some patience.   A stand mixer helps but is not necessary.  All the other ingredients are available at most grocery outlets.

Ingredients for a 14" "Uno's Deluxe":

Crust:

1/2 C Wheat Flour

1 C Semolina Flour

2 C All Purpose Flour

1/3 C Olive Oil

1/2 TBSP Yeast

1/2 tsp Salt

1/2 tsp Sugar

8 oz. beer, heated to about 100 degrees, no more.


Fillings:

1 large can Crushed Tomatoes 28oz, strained

Basil

Garlic Salt

8 oz package Provolone cheese slices

8 oz Mozzarella block, grated

Fresh mushrooms, sliced

1 Green Pepper, sliced thinly

1 smallish Onion, diced

Pepperoni, sliced

1/2 lb. Italian Sausage (I like fennel, so I add fennel to mine), added to pizza in little chunks

Green Olives, sliced

Time:  About 3.5 hours total

More Notes:  If you don't want the wheat crust, just substitute 1/2 cup all purpose flour for the 1/2 cup of wheat flour.  You can also make this crust with water instead of beer, but then you're making a Chicago Deep Dish, not a Platteville one.   Omit the mozzarella on top if you want a true Chicago style pie, the cheese on top is "A La Mode", a Platteville Uno's specialty.  Put any toppings on that you like, but this is the recipe for a Platteville Uno's Deluxe.

Start by adding the beer, yeast and sugar into a mixing bowl or the bowl of your stand mixer.  Give a gentle little stir to get things going and wait about 5 minutes or so, til the yeast starts bubbling and there's a foamy head across the top.

Add 1 cup of all purpose flour, the oil and salt.  Mix together to form a batter-like solution.  Slowly add the rest of the flours.  Don't knead this a ton, and on the stand mixer you just want to run it on a slow speed with the dough hook til a ball forms...no more.  If it's a little shaggy, that's fine.  If doing it by hand, just so that the dough is well-mixed and forms a ball nicely.

Line the bowl with olive oil and rub some on the outside of the dough ball, put the ball in the bowl again and cover the bowl with plastic wrap, set in a warm place.  This should be done at LEAST two hours before pizza making time.

When you're done with the dough, open the can of crushed tomatoes and dump into a fine mesh strainer over a bowl.  Let strain for an hour, giving it a little shake now and again, to remove as much tomato juice as possible.   When strained, stir in a little garlic salt and basil.

Take one of the upper racks out of your oven and completely cover it in aluminum foil, put back in the oven at about the 2/3rds position.  Two rack spaces below, put an uncovered rack.   

About 45 minutes before pizza baking time, turn your oven on to 500 degrees.  Let that thing heat up, good and hot!   While that's happening, brush your pizza pan with olive oil, place the dough in the center and start working it toward the edges.  When you get to the edges, press up the sides so that the dough is paper-thin on the sides and the bottom is evenly thick.   

Next take the provolone slices of cheese and, starting in the center, arrange them so the entire bottom of the crust is covered in provolone.  Then add your meats, mushrooms, onions, green pepper, olives.  Over the top of all of this, cover with sauce.

Turn your oven down to 450.  Put the pie in the oven on the rack below the one covered with aluminum foil.  Set the timer for 20 minutes and bake.

When the timer goes off, remove quickly from oven, cover with shredded mozzarella, put back in the oven for another 20 minutes.  You may want to check on it at 15 minutes, ovens vary.  Remove when the cheese starts to brown in spots.

Cool for at least 15 minutes before slicing.  This pizza type is best served in pie slices, you'll end up with a mess if you try to do squares.

Enjoy!!!  


Thursday, April 16, 2020

Incredible Scalloped Potatoes


I'm not a big Scalloped Potatoes fan, or at least I wasn't.   But lately, I've craved some old-timey dishes that my mom and grandma used to make.   Scalloped Potatoes is one of those kind of dishes.

A few years before my mom passed away, while she was more or less confined to her chair, she asked me what I wanted for Christmas.  Since we were all going to try to make as many gifts for each other instead of buying them, I asked if she'd write her favorite recipes down for me.   It was and is a wonderful gift that I use all of the time, this box of my mom's treasured recipes, but unfortunately it doesn't contain a recipe for Scalloped Potatoes.   So....I went searching.

And as often is the case, I'll find several recipes that aren't quite what I have in mind.  I'll take the parts that I like from each and create my own hybrid recipe.   Usually, it turns out.  Sometimes it doesn't.  And sometimes, it's an enormous hit, as in the case of the recipe I post below.   Seriously, this is like pizza, it's so good.   There aren't any pictures, because the dish didn't last long enough to take any!  And it's the perfect dish to use up leftover ham with.

The key to this one is slicing the potatoes and onions thin.   The thicker they are, the more chance that they won't be 'done' in the allotted bake time.

You'll need:

9 x 9 Pyrex dish

4 T Butter
2 T Flour
1.5 C Milk
2 medium Onions sliced thin
4 reasonably sized Potatoes, peeled and sliced thin
12 oz. Ham, sliced, then diced
Grated Cheddar (or experiment! I bet Swiss would be incredible)

Preheat oven to 350.   Grease the 9 x 9 Pyrex dish.

Slice onions and potatoes, slice and dice ham, grate cheese (if you haven't already).

In a saucepan, melt 2 T of Butter, whisk in 2 T of Flour til a roux is formed.   Remove from heat, add milk, whisk in til the roux is completely mixed in with the milk.  Return to medium heat and stir often til it thickens.   Season with salt and pepper, remove from heat and set aside.

In a fry pan, add 2 T Butter and the Sliced Onions.  Cover on medium heat, stir occasionally, cook til soft and golden, starting to carmelize.   Remove from heat.

In the Pyrex 9 x 9, assemble two layers thusly.   First, half the white sauce, then half of the potato slices, then on top of that, ham, onions, grated cheese.  Repeat for the second layer.

Bake 350 for about 50 minutes.

Tuesday, January 7, 2020

Dad's Oyster Stew


Every Christmas Eve for as long as I've been on this planet and even before that, my father has made Oyster Stew on Christmas Eve.   It's a tradition that his parents - my grandparents - had and may go back even further than that, likely on my grandmother's side.  My grandmother made Oyster Stew throughout the Winter when my dad was a boy, it was the perfect thing to warm up wet, cold children after a day at the sledding hill.

Dad is very particular about this recipe.  He insists that it not be altered in any way and nothing else be added, no matter what anyone might suggest and I agree with him.  It is, in a word, perfection.  And absolutely delicious.

1 pint fresh raw oysters
1 stick of butter - real butter, no substitutes.
1 quart WHOLE Milk, not skim or any percent.
1 cup Half and Half
1 cup Oyster Crackers, crushed to powder
1 T salt
1 t pepper


Start by cutting the stick of butter in half.  Put one of the halves in a small fry pan and set to medium-low.   Strain the juice from the oysters into your stock pot.   Once strained, put the oysters in the fry pan with the butter and simmer til the oysters are curly.

In the stock pot, add to the oyster juice the other half of stick of butter and the quart of milk.  Heat on low, bringing up to heat slowly.  NEVER LET THE STEW BOIL...EVER.   Once it's warm to hot, add the oysters/butter and stir slowly.   Add the salt and pepper.  Crush the Oyster Crackers by putting in a ziplock bag and crushing with a rolling pin til finely crushed, slowly stir into the stew.   Add the half and half.   Add salt and pepper to taste.  Simmer on lowest heat setting for 15-20 minutes, then refrigerate.   Serve the next day...it truly needs to sit for a day.   Again, never let it boil when bringing it up to heat.   Serve with oyster crackers.

Wednesday, December 27, 2017

Instant Pot Salmon Dill Sweet Potato Chowder

My wonderful wife gave me an Instant Pot programmable slow cooker for Christmas!   I didn't even know such things existed.   These things are so cool, and once you have one, you'll wonder how you ever lived without one.  It isn't just that things cook much more quickly in them, it's that they cook so evenly and perfectly!

My stepdaughter Silvia got first whack with it, as she had some experience with these things previously.  She made hard boiled eggs.  They all came out perfectly cooked and peeled effortlessly.  Wow.

I had the second go with the pot, making wild rice for Christmas Dinner.   25 minutes in the pot and they came out perfectly cooked.

We had thawed a big package of Salmon just before Christmas that we were too tired to make for dinner on the intended evening, and through the rush of the holidays, had to use up, so I thought a good Salmon chowder was in order.  Looking at some other recipes for chowders in the Instant Pot and taking stock of ingredients we had on hand (at the holidays our refrigerator was bulging already so I wasn't going to go out and *buy* anything!), I came up with this tasty and warming chowder.  I hope you enjoy it, I did!

1 lb Fresh or Frozen Salmon (even canned would work, I suppose, I used frozen)
2 T Butter
3 Cloves Garlic, minced or pressed
1 medium onion, diced
3 stalks celery, chopped
1 QT hot water for broth
1 1/2 T "Better than Bouillon" brand Lobster base, mixed with above
1 sweet potato, cubed
1 can sweet corn, drained
2 bay leaves
1 pint half and half
2 cubes Dorot brand frozen dill (in larger supermarket frozen sections, Woodmans has near frozen organic)

Remove skin from fish with a sharp filet knife.  You don't have to be pretty about it.

Set the Instant Pot to Saute medium, melt the butter, add the garlic and onion and saute til onions start to clear, then add celery, continue to saute until the celery is softened.

Add broth, sweet potato, corn, bay leaves and fish, seal the pressure cooker and cook on 'manual', high pressure, for 5 minutes.   Let the pressure release naturally, when it has released, open and stir in the dill cubes and the half and half, remove the bay leaves.   Set to "Saute" again and stir while bringing to heat, then either serve or set to slow cook for the shortest time period (on mine it's 30 min) with 'keep warm' setting and serve when ready.


Tuesday, May 23, 2017

Stollen...It's Not Just for Christmas Anymore!


Mmmm...stollen, that wonderful German fruit bread cake thing.  I don't know if it's a bread or a cake or what, and I don't care.  I just like it...a lot!

When I was a kid, there was an elderly couple living next to us who ran a restaurant before they retired.  "Ma" Strehlow baked everything fresh every day for her husband Bill.   Daily, she made homemade donuts, homemade bread, and at Christmas time, stollen.

My mom was a terrific cook, but she always was frustrated with the results of her Stollen, even though Mrs. Strehlow had bestowed upon her 'the recipe' before they moved into assisted living in the late 1970's.

After my mom passed away, I decided to have a whack at making Stollen myself...someone had to do it, right?   I looked at 'the recipe' and compared it to many others in cookbooks and online and figured out what Mrs. Strehlow probably intentionally left out (she had a habit of doing that before handing out a recipe).

And it's NOT just for Christmas!  This past year I got frustrated with the crummy "king cake" recipes I had tried for Mardi Gras, so I just made stollen, formed into a ring and decorated as a king cake instead!   It's too good to have just once a year.  And it's not that hard.

You will need:

Stand Mixer (like a KitchenAid or similar)

For the Fruit:
1 C mixed candied fruit
1 C raisins
3 T Brandy

For the Sponge:
1 t or 1 package active dry yeast
1/4 C warm water (about 110 degrees F)
2/3 C milk
1 t honey
1 C unbleached all-purpose flour

For the Dough:
1/3 C honey
1 large egg, beaten
1 stick butter, softened
1 T grated lemon zest
1 t salt
1/2 t ground mace
1/2 t ground nutmeg
1 C chopped almonds, toasted
3 to 4 C unbleached all-purpose flour
Oil, for coating bowl

For the Filling:
2 T butter, melted
2 t ground cinnamon
3 T granulated sugar

For the Frosting:
1 cup confectioners' sugar
Milk, to thickness
Green and/or Red Candied Cherries

Start by combining the mixed fruit, raisins, and Brandy. Set aside. Stir the mixture every so often to coat the fruit with the Brandy.

In the stand mixer bowl, sprinkle the yeast in the water to soften. Heat the milk to 110 degrees F and add it to the yeast along with the honey and 1 cup flour. Cover the sponge with plastic wrap and let rise until light and full of bubbles, about 30 minutes.

Now add the fruit mixture, honey, egg, butter, zest, salt, mace, nutmeg, 1/2 C almonds, and 2 cups of the flour to the sponge. Using the paddle, beat the mixture on medium low speed for 2 minutes. Gradually add the remaining flour 1/4 cup at a time until the dough begins to pull away from the side of the bowl. Change to the dough hook. Continue to add flour 1 tablespoon at a time until the dough just begins to clean the bowl. Knead 4 to 5 minutes on medium-low.

First rise: Put the dough in an oiled bowl and turn to coat the entire ball of dough with oil. Cover with a tightly woven towel and let rise until doubled, about 1 hour.

Shape and Fill: Turn the dough out onto a lightly oiled work surface. Roll the dough into a 9 by 13-inch oval.  Brush the melted butter over the top of the oval. Combine the cinnamon and granulated sugar and sprinkle over one lengthwise half of the oval(s). Fold the dough in half lengthwise and carefully lift the bread onto a parchment-lined or well-greased baking sheet. Press lightly on the folded side to help the loaf keep its shape during rising and baking.

Second rise: Cover with a tightly woven towel and let rise for 45 minutes.

Preheat oven: About 10 minutes before baking, preheat oven to 375 degrees F.

Bake and cool: Bake for 25 minutes until the internal temperature of the bread reaches 190 degrees F. Immediately remove from the baking sheet and place on a rack to cool.

When cool, mix up some frosting and frost.  Sprinkle remaining toasted almonds over the frosting and run a line of candied cherries down the middle.   Mmmmm!

Tuesday, March 14, 2017

I'm Back!

Dad's Pepper Relish


Once I got over my initial shock regarding my Diabetes diagnosis and learned to live with it better, I found that - with a certain amount of due diligence - I didn't have to give up *everything*.

Such it is with Dad's Pepper Relish.   We've been eating this for many years, and it may be that my mom originally came up with it, I'm not sure nor is Dad, but he usually ended up doing the making of it regardless of who's idea it was.

This condiment is incredible on burgers, brats, hot dogs, hot beef, any kind of sandwich.  I also like it in egg salad, mixed with rice, topping a bagel with cream cheese or added to anything that you want to add a little kick to.  It can be eaten right away, but as with many things, is best after a day or more.   It keeps in the refrigerator for a long time if kept in mason jars, and takes just minutes to make.

Ingredients:

Pickled Jalapeno Slices
Celery (or Cucumber)
Onion
Green Olives with Pimentos
Olive Oil

For whatever amount you wish to make, finely dice the pickled jalapeno slices.  Whatever amount you dice up, take about half that amount in each of the rest of the ingredients and dice those up.  Mix all together in a bowl.  Add olive oil...about a Tablespoon for each pint you make.   Stir well and put in a mason jar or jars, refrigerate.  If using cucumber, peel, slice in half and remove soft center seedy part and discard, then dice the rest of the cuke up.    Dad always makes it with celery...I was out of celery one day and tried the cuke, and I like it either way.

Jalapenos too hot?   Try pepperoncinis, banana rings, whatever you like!

Friday, September 23, 2016

Farewell...


Hello everyone.  It is with regret that I must make this my final entry into my foodie blog.  I have been diagnosed with Type 2 Diabetes and will have to completely change my diet, which excludes about 99% of the recipes that I have posted here.

I'll miss sharing my recipes with all of you, but to be honest, what I'll miss more is pizza, gyros, soups (too salty), ribs, steaks, and pretty much anything except Wilford Brimleys goddamned oatmeal, which is about what I'm left with.  I guess it beats the alternative.

Enjoy my recipes that I have posted.   I wish you all happiness and great fun in the kitchen.

--Mike

Wednesday, September 14, 2016

Colonel Roy's Steak Trick


Steak!   Who doesn't love a wonderful big slab of flesh, grilling away over a bed of red-hot coals? But the price of beef has gone through the roof over the past 5-10 years to the point that one may as well spring for crab legs or lobster as a Rib Eye...even at home.

Ahh, but my good friend and long time partner in foolishness, maple syruping and talking out of our arses Colonel Roy comes to the rescue with a method (along with a couple tricks of my own) to make even the cheapest cuts of beef turn out tender and delicious!!!

You'll need:

1 Cheap Beef Roast.  Chuck, Round, English, whatever is on sale, find a thick one that, if cut in half through the middle lengthwise, would make two nice steaks.  Pay attention to marbling, it should have nice marbling and the fat shouldn't be too thick.  Boneless preferred.

1/2 pot or so of stale coffee
1/2 c. Olive Oil
Large ziplock bag

Cut the roast in half through the middle the long way to make two steaks.  Use a very sharp knife and be careful.  Put the steaks in the ziplock bag, pour the olive oil in and fill the rest up with coffee.  Shake around a little to mix well.  Set aside for at least two hours.  More is better, I like to do this in the morning for grilling in the evening.   If you're going to do it all day, put in fridge.  If you're just going to do it for 2-3 hours, don't put in fridge.

About 1/2 hour before grilling, lightly season both sides with garlic salt and pepper and a dollup of olive oil about the size of a U.S. quarter poured on to each side of the steak and rubbed in.

Grill over hot coals.  I like to use maple coals, but good old charcoal works also.   It will be about as close to the tenderness and taste of a good rib-eye as you can get for a quarter of the price.


Sunday, July 31, 2016

Summer Garden Goodies I


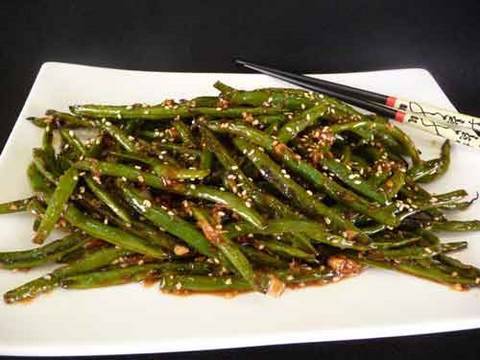
Summertime...late July, when the garden starts producing lots of yummy things to eat.   Here's a couple recipes for you.  One is an Oriental Sesame Green Bean recipe that I came up with, the other is a Cucumber salad that my mom always made, and my favorite way to have it is over mashed red new potatoes.  Mmmm!

Cucumber Salad

3-4 medium cukes, peeled and sliced
3-4 green onions chopped or 1/2 medium onion, sliced thin
Head of Dill (optional)
Vinegar
Water
Sour Cream
Mayo
Salt
Pepper

Put the cukes and onions in a bowl.  Add vinegar just to cover, then add about 1/4 as much again in water.  Add a tablespoon of Salt.   Let sit for at LEAST an hour...two is better.

Drain cukes and onions.  In bowl, mix cukes, onions, chopped head of dill, a large dollup of sour cream and about half that in mayo.  Stir, adjust salt and pepper to taste, let sit at least a half hour before serving.  Serve as a side with summer meals like burgers, BLT's, or my favorite way, over mashed new potatoes.


Oriental Green Bean Salad

1 lb fresh green beans, ends trimmed.
Oriental sesame oil
Soy sauce
Olive oil
Sesame seeds
Salt
Sugar

Steam the green beans in the microwave for about 5 minutes.   In the meantime, heat up a tablespoon of olive oil, and a tablespoon of sesame oil in a wok or fry pan.  When beans are done steaming, add a tablespoon of soy sauce to the wok and toss in the green beans.  Add sesame seeds to your liking.  Stir frequently on medium high until beans are 'done', seeds are toasted and the liquid is almost gone.  Sprinkle in about a teaspoon of sugar and salt to taste, stir constantly til beans just start to brown.   Serve.


Wednesday, April 13, 2016

Maple Smoked Country Style Ribs


We have a cabin up in Price County that sits in a forest which is about 3/4 made up of Sugar Maples.   Naturally, in the Spring, we make maple syrup.  It's a great activity during a time of year when one really needs to get the hell out of the house and *do something*, even if mostly what's involved is standing around, drinking beer, talking smart and stoking the fire.

What with all that standing around and fire-stoking, it's also a perfect time to fire up the smoker.  Might as well tend two fires as one, eh?   We have one of those Brinkmann smokers with the offset firebox and they work really well, especially with a few modifications (Search YouTube for the mods if you have one).  Any kind of smoker will work.   And, if you time it out right, your maple boil will be done about the same time your meal will...the smoking process takes about 6 hours + a good 1/2 hr to get the fire going.

Ingredients:

3-4 lbs Country Style Ribs
1 cup REAL maple syrup
2 T smoked paprika
2 T chili powder
2 T cumin
2 T garlic powder
2 T onion powder
2 T black pepper
2 T salt
Fresh maple sap
Small chunks of maple wood, split into kindling size, about a half of a pail full.

I usually buy a bulk package of Country Style Ribs...they can be bone-in or boneless.  Take them the night before and put them in a very large mixing bowl.  Add to this the maple syrup and all the spices and mix thoroughly with your hands til each piece is well coated with seasoning/syrup.  Refrigerate overnight.

First thing in the morning, about 2 hours before you light the fire, put about 2/3 of the maple kindling into a pail and fill with fresh maple sap. (You can use water...but if you have sap, use it!)  Save 1/3 of the kindling out for dry use (it's easier to regulate your fire temperature with a mix of dry and wet, adjusting as necessary).  

Light your fire with some of the dry wood and added maple twigs, etc. til you get a good hot fire going, then add some of the wet maple and adjust so that the heat in the smoker gets to about 180-220.   Keep the temp at that range throughout the process.

Once you have your smoker up to temp, put all the meat in your smoker.   It helps to also put a pie tin of beer in somewhere below the meat, to keep it moist.  Seal up your smoker and keep the fire going.  Don't peek!

After 2.5 hours, open the smoker up and flip and re-arrange all of the pieces...ones closer to the fire should be flipped and moved furthest away, etc. to make sure all the pieces get about the same exposure.   Close it back up, keep the fire going within the specified temp range, and take the meat off after 5 hours.    Serve with your favorite barbecue sauce.

I like to serve with cole slaw, beans and french fries, and I also like to make my own barbecue sauce, but I never really make it the same way twice so it would be hard to post a recipe for it.    It usually involves ketchup, beer, maple syrup, finely diced onion, garlic and god knows what else, and then slowly simmering til I like the thickness.

Update:  If you're lazy (like me), you can skip all the seasonings listed and just use Tony Chachere's Creole Seasoning, available in most stores.  Rub that liberally into the ribs and slather with syrup.  If you can't get real maple syrup, try crappy store bought syrup mixed with molasses.


Tuesday, February 16, 2016

Best Ever Turkey Pot Pie

Kathy and I both love to cook.  It's not often, however, that we're in agreement on what we like.  I tend to like spicier, meatier things, she tends to like things that are pasta and veggie-heavy.  In short, she likes healthier things than I do, as a general rule.

Recently, we were hungry for turkey, so we did the whole 9 yards...turkey in the oven, mashed potatoes, cranberry sauce, etc.   There's only two of us in the house, so when I went to look for ways to use up the leftovers, I started researching Turkey Pot Pie recipes.   As is usual for me, I took what I liked from several different recipes and made one of my own.   It turned out so good that my wife and I both agreed...best turkey pot pie ever!   Hopefully, you'll agree.

2 C frozen peas and carrots
2 C frozen green beans
1 C chopped celery
1/2 C butter
1/2 C chopped onion
1/2 C flour
1 t salt
1 t pepper
1 t celery seed
1 t onion powder
1 t garlic powder
1 1/2 C chicken broth
3/4 C milk
4 C cubed cooked turkey meat - light and dark meat mixed


Preheat oven to 425.  Place the peas and carrots, green beans, and celery into a saucepan; cover with water, bring to a boil, and simmer over medium-low heat until veggies are tender, about 8 minutes. Drain the vegetables in a colander, set aside.

Melt the butter in a saucepan over medium heat, and cook the onion until translucent, about 5 minutes. Stir in flour, salt, black pepper, celery seed, onion powder, garlic powder; slowly whisk in the chicken broth and milk until the mixture comes to a simmer and thickens. Remove from heat; stir the cooked vegetables and turkey meat into the filling until well combined.

Fit a pie crust into the bottom of a deep pie dish. Spoon the filling into the pie crust, then top with another crust. Pinch and roll the top and bottom crusts together at the edge of pie to seal, and cut several small slits into the top of the pie with a sharp knife to release steam.

Bake in the preheated oven until the crust is golden brown and the filling is bubbly, 30 to 35 minutes. If the crust is browning too quickly, cover the pie with aluminum foil after about 15 minutes. Cool for 10 minutes before serving.

Friday, August 28, 2015

Gyro Flies Pepsi! Pt. II - Pita Bread


At long last, you can finally make your own Gyros at home!  And not the lame-ass kind that come in a kit...I mean honest to goodness, crowded, loud shop full of Greek immigrants and pungent smell of gyro meat on the rotisserie, stink like gyros for days Greek Gyros!!!

A couple years ago, I helped you get about 75% there when I published this blog post on how to make the meat and tarziki sauce at home from scratch.   Thanks to an anonymous reader of this blog, here is 'the rest of the story' -- making the Pita Bread.

You will NEVER buy Pita Bread in the store again!  You'll find yourself making this for lots of other things besides Gyros.   It's easy, fairly forgiving, and insanely delicious.

1 c. warm water, about 95 degrees
2 tsp. active dry or instant yeast
2 3/4 c. flour
2 tsp salt
1 T olive oil

Instructions

Make a yeast starter by mixing the water and yeast and a pinch of sugar for the yeast to feed upon and let sit for about five minutes until the yeast is dissolved and foaming up a bit.  In a mixing bowl, add flour, salt and olive oil, add yeast mixture.   If using a stand mixer attach the dough and knead the dough on medium speed for about 8 minutes, til you have a smooth dough. If using your hands sprinkle a little of the extra flour onto your clean work surface and turn out the dough. Knead the dough for about 5-7 minutes, until the dough is smooth and elastic. Add more flour as needed to keep the dough from sticking to your hands or the work surface, but try to be sparing. It's better to use too little flour than too much. If you get tired, stop and let the dough rest for a few minutes before finishing kneading.

Coat the inside of a large bowl with olive oil, place the dough in the bowl, cover with plastic wrap and let rise at room temp for about 1 hour til the dough doubles in size.  For all practical purposes, you're done at this point until you're ready to make the gyros, because although these pitas are good anytime and keep well, they're best fresh.   You can refrigerate the dough for up to a week.

When ready to make pitas, heat up a cast iron skillet with a little olive oil in it, on medium-high.  Divide the dough into 6 balls.   Using a floured rolling pin, roll one of the balls on a floured surface into a circle about the size of your skillet.   It will want to spring back at first, but keep rolling, re-flouring the rolling pin if necessary.  Suddenly it will behave and roll out with ease.

Lay a rolled-out pita in the skillet and watch until you see bubbles starting to form. Flip and cook for about 30-45 seconds on the other side, until large toasted spots appear on the underside. Flip again and cook another 30-45 seconds to cook the other side.  Remove from heat, keep covered on a plate with paper towel until all the pitas are done, serve!  Enjoy gyros that will make you swear you're on State St. in Madison, WI!

Thursday, August 27, 2015

A-2 Sauce


I'm a freak for A-1 sauce.  I'd sit down on the porch with a gallon of it and a glass and drink it all if I could.  I put it on steaks, burgers, hash browns, toast, rice, potatoes, just about anything.  I even tried it on ice cream once.  It wasn't too bad!   Well, for someone who's an A-1 sauce freak, that is.

But the stuff has gotten really spendy.  The price started climbing about the time Kraft took it over and ruined the label and took all the medals from the 1890 Exposition off, and dropped "Steak" to leave just "Sauce".  They haven't ruined the recipe...yet...

And so, like with so many other things, I set off to learn how to make my own A-1 Sauce clone.  Something close to this recipe can be found elsewhere on the net, but I think my tweaks and revisions end up with a better sauce overall.  It's very close to A-1 sauce, it's clearly tastier to me than any other brand of steak sauce, and the price is right, much cheaper overall than buying the equivalent amount at the store.  Plus, if you're a foodie, you probably have most of the ingredients lying around.

A-2 Sauce:

1/2 c. cold water
1/4 c. raisins  EDIT:  Use golden raisins, it will taste more like A-1.
1/2 c. balsamic vinegar (don't substitute)
1/4 c. good Worcestershire sauce (I used Lea and Perrins)
1/4 c. Ketchup
1/4 c. Dijon mustard (I used French's Chardonnay Dijon, Poupon would work fine)
1/4 t. black pepper
1 garlic clove, diced up
1 stalk celery, cut up
1/4 t. salt
1/4 t. celery seed
1 t. bottled Lemon Juice
1 tsp onion powder
1 orange

Put all but the orange in a saucepan on the stove.   Cut the orange in half, squeeze the juice into the saucepan.  Scoop out the innards from the orange half.   Squeeze the juice from the other half of the orange into the saucepan.  Bring to a simmer and let simmer for about 15-20 minutes.

Do not attempt to adjust seasonings until cool, the taste changes from hot to cold.

Strain through a strainer and bottle.  Serve at your next steak fry, or try on hamburgers, brats, meat loaf, pudding, ice cream, cake, brownies, macaroni, kiwi fruit, bananas...


Saturday, July 25, 2015

Rockin' Ramen Salad


Ok, kids...you've probably all had this at one time or another at a pot luck in the summer.   I'm a self-admitted Ramen Salad maniac, I just LOVE the stuff.

I've piddled around with recipes for years before settling on this one, which is--as most of my recipes are--a hodgepodge of other recipes plus my own twists.

1/2 head cabbage, finely chopped
1 medium onion, chopped
2 pkg. Ramen noodles (Oriental flavor), crumbled
1/2 c. sliced almonds, toasted
2 carrots, chopped
1/2 cup peas

DRESSING:
2 tbsp. sugar
3 tbsp. vinegar
1 T sesame oil
1/2 c. olive oil
2 T soy sauce
1/2 tsp. pepper
Flavor packet from the noodles

Chop up the carrots and cabbage (or just buy a bag of 'Slaw Mix' in the produce section).  Toast the almond slivers in a buttered skillet til just turning brown, remove.  Mix all ingredients for the salad in a bowl.  Mix the dressing ingredients, pour over bowl, mix well, refrigerate.  Like all such salads, it's better if made the night before.

Now, some people will argue that the Ramen noodles should be crunchy.  If that's the way you want it, leave the Ramen noodles OUT til just before serving, then mix them in.

Enjoy!

Friday, January 16, 2015

3D Printer Bean Soup


First, you don't really make this soup with a 3D Printer...but it's ALMOST that easy!   Thick, hearty bean soup is great on a cold winter day.   It'll thaw out your innards and 'get you moving', if you know what I mean.  And it's DELICIOUS!!!

You can kind of go nuts with this recipe, adding or subtracting root vegetables like parsnips, turnips, rutabaga and carrots, or add/subtract herbs to your liking, but this is the basic recipe.  You need a crock pot, which is kind of like the culinary version of a 3D Printer.   Sort of.  Well, maybe not.

In this recipe, I used a grapefruit-sized chunk of smoked pork shoulder (Usinger's brand), but any chunk of ham product would work, as would a 16 oz. package of diced ham, which would even save you the trouble of dicing.  

1/2 lb chunk of Smoked Pork Shoulder or Butt
16 oz bag of Great Northern Beans
1 large Onion
4 medium Carrots
2 Qts Water
1 T Chicken Bouillon powder
2-3 Bay Leaves (Mom always said it's not soup without Bay Leaves)

Dice the Smoked Pork and the Onion.  Slice the Carrots.  Put all ingredients in a crock pot, turn on High for about 4 hours.  Stir, check progress (all crock pots cook at a little bit different rates), leave on high or turn down or turn off at your judgement.  Beans and Carrots should be soft, liquid should be milky and not clear, ham should be starting to fall apart a little when done.  Salt and pepper to satisfaction.   As with all soups, the longer it sits, the better it is. 

About 5 minutes of prep, and an occasional stir.   That's it!

Thursday, January 15, 2015

Wise Guy Baked Ziti


Ok, I admit it.  I'd never heard of Baked Ziti before I watched the Sopranos.  Of course, growing up in Central Wisconsin as I did, I wasn't exposed to a lot of Italian neighborhoods.  You'd have to travel a few hours to find one.  Mostly, it was Poles, Germans and Norwegians around where I grew up.

I developed this recipe over several years of tinkering with a very basic Ziti recipe, and it's always a big hit.   No, not that kind of hit...it's not going to rub you out, but it will sure fill you up!  Throw this in the oven, pop "The Godfather", "Goodfellas" or "The Sopranos" in the DVD player, get the Grappa ready for afterwards, and enjoy!

1 box Penne (Ziti) Pasta
1 lb Italian Sausage
1 16 oz container Ricotta Cheese (use Cottage Cheese in a pinch)
1 T finely chopped fresh Basil
1 T fresh minced garlic
16 oz grated fresh mozzarella
1 can of Red Sauce of your choice** (I usually used canned Hunts or Del Monte and jazz it up with red  wine and seasonings)
8 oz. fresh mushrooms
1 medium onion, diced finely
1 small container Feta cheese crumbles
A small amount (1/3 cup at most) milk

Start by boiling salted water and adding the Pasta, cook til Al Dente (so they're just on the cusp of being 'done' but a bit chewy yet).   While the Pasta is cooking, fry up the Italian Sausage and drain off the grease.   Strain the Pasta and cool.   Mix the Pasta with the Ricotta cheese, Feta cheese, Minced Garlic, Chopped Onion, Chopped Basil and Milk.   In a 9x12 Pyrex dish, lay down a layer of half of the Red Sauce, then the Pasta
mixture, then the layer of Italian Sausage, then a layer of Mushrooms.   Grate the Mozzarella Cheese over the top and finally cover completely with the other half of the Red Sauce.   Bake in a 350 oven for 1 hour.

**Update:  I have since grown a bit and no longer use crappy commercial 'spaghetti sauce'.   A great, easy red sauce can be made by taking a can of good quality (not big commercial brand, but imported from Italy) crushed tomatoes and putting it in a saucepan on medium low.  To this, add a heaping T or more (to taste) of sugar, some garlic salt, a bunch of finely diced garlic toes, about a quarter cup red wine, finely chopped basil, some oregano and/or Italian seasoning, optionally some finely diced green peppers and/or onion.  Simmer on low, covered, for an hour or so, then uncovered til it reaches a nice, thickish consistency.

Of course, if you're in a hurry or just a lazy sot, you can always hit the Ragu.

Thursday, January 8, 2015

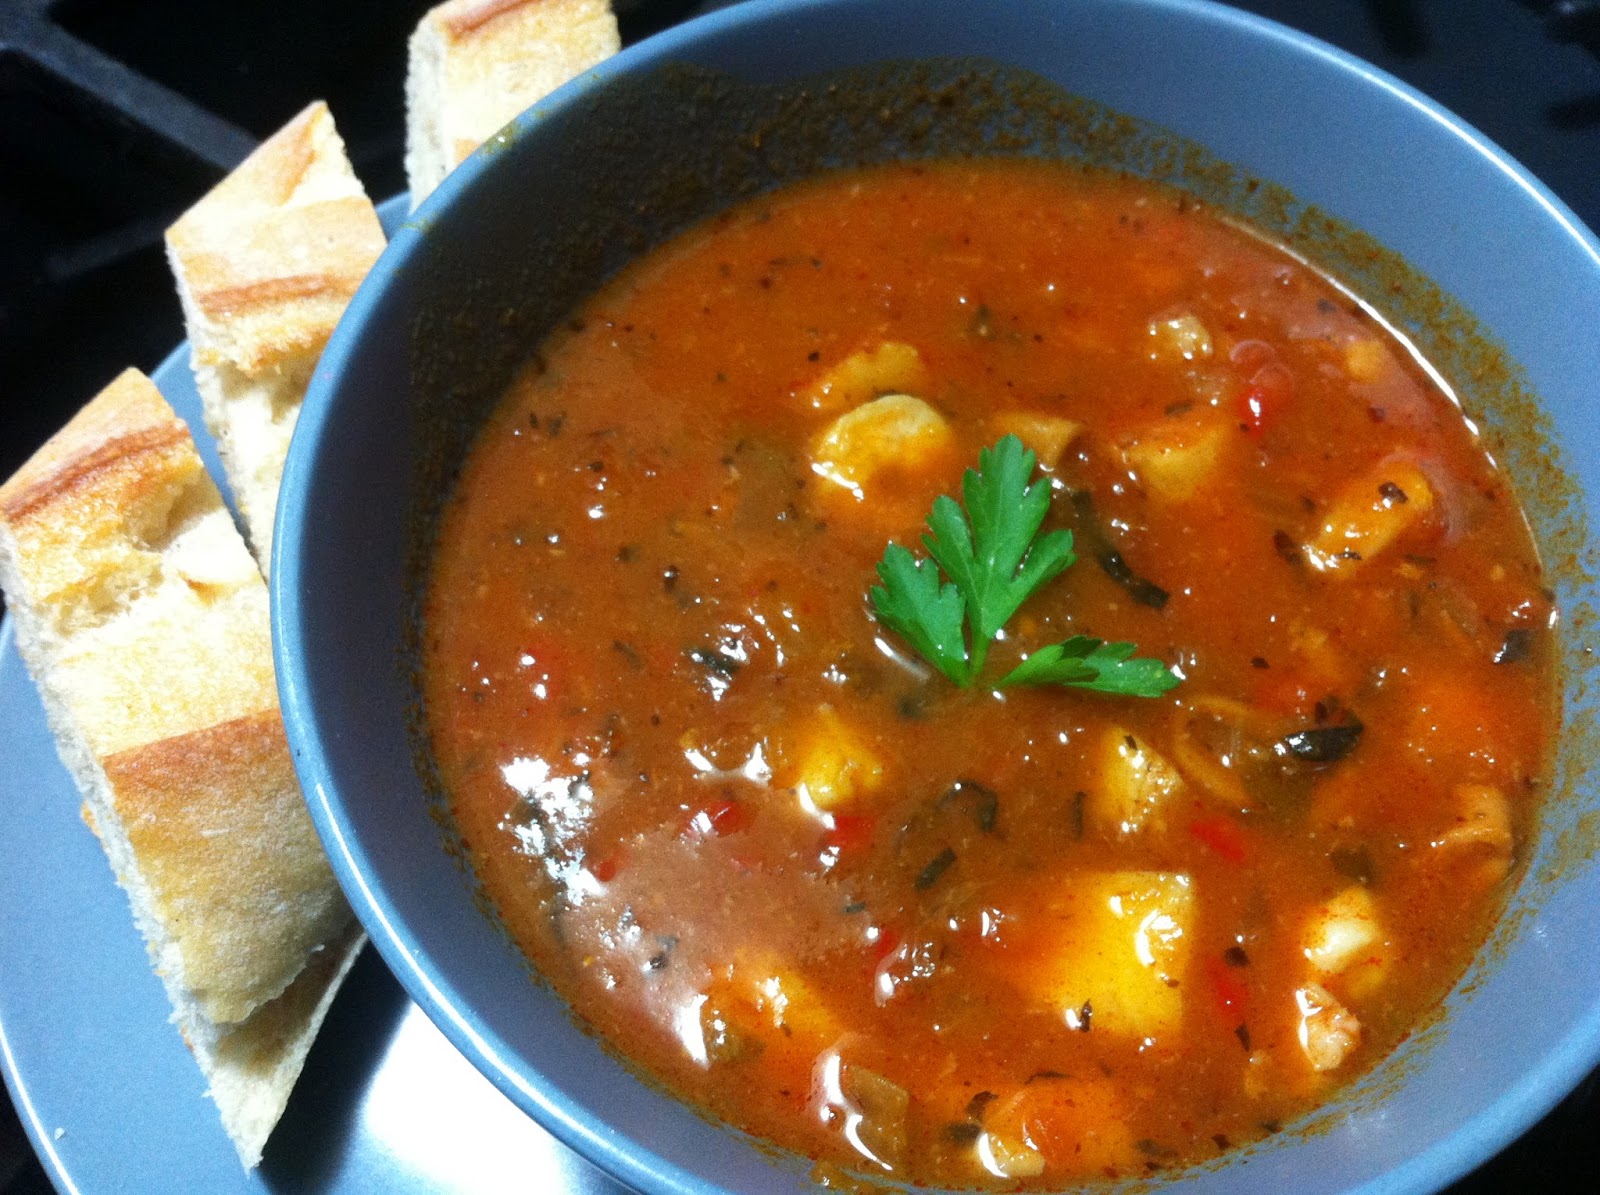
Cioppino - Quick and Easy


Cioppino - an Italian seafood stew - warms the tummy and the heart.   It's wonderful on a cold winter day, or to take the wet out of a cold rainy day the rest of the year.   There are about as many ways to make Cioppino as there are Chili, but this is my Mom's recipe and my go-to one.  Here in the Flyover Zone, where we're far from fresh seafood unless it's flown in at great expense, frozen 'seafood mixtures' are the rule rather than the exception and they work well.  Trader Joe's has a great seafood mix.  Woodman's Grocery in Wisconsin also has one, though it's heavy on the mussels (I pick most of them out while the mix is still frozen and throw them in a separate bag of collected mussels for later use...they're a little fishy for my taste).  What we lack in fresh seafood we make up for in garden fresh or home-frozen tomatoes and herbs, which make up a great deal of this stew's flavor as well.

Make up a batch and try it for yourself.  I'm sure you'll love it as much as I do!

1/3 cup Olive Oil (can use 1/3 cup butter)
1 medium-large or 2 small Onions, diced finely
1 small can Diced Tomatoes
1 quart bag Frozen Tomatoes or 1 can Whole Tomatoes
2-3 cloves Garlic, diced finely
1 Bay Leaf
1 tsp Basil
1/2 tsp Thyme
3/4 cup Sweet Vermouth
1 bag frozen Seafood Mix (sometimes called Seafood Medley)
1/2 cup chopped Parsley
1 can (or bouillon equivalent) Chicken Broth
1 cup Water

In soup kettle, add Olive Oil, Onions, Garlic and Parsley.  When Onions are clear, add Tomatoes, Broth, Water and Sweet Vermouth (or any Red wine).   Bring just to a boil, bring heat down to simmer, add herbs and simmer for 15 minutes.    Add Seafood and simmer until the seafood is done.   The longer this sits, the better it tastes.  Serve with good bread and a salad.

Thursday, October 30, 2014

Mom's Cornish Pasty


Mmmmm, Pasty.   If you're not from Wisconsin or Upper Peninsula of Michigan, you may have never heard of these small meat pies that were the workingman's meal for many a Cornish and Finnish immigrant in the 1800's.  Cornish immigrants worked the galena (lead) mines in the Southwest corner of the state while Finnish immigrants worked the iron ore and copper mines in Northern Wisconsin and the Yoop (short for U.P. or Upper Peninsula...residents are referred to as Yoopers).   The Pasty was their staple food...hearty, well rounded, filling and cheap.  And as one Yooper told me, "A Pasty isn't a Pasty without Rutabaga".

Traditionally, they are made as individual-sized pies, but Mom always made Pasty as a whole pie from which slices were served.  You can do either with this recipe, though I'll give the recipe as a whole pie.  If you want individual pasties, just roll out smaller pieces of the pastry crust and put an amount of the meat mixture into the center, fold the crust over and pinch the edges, vent and bake.

There are a lot of options for making them, you can pretty much 'clean out the fridge' of vegetables.  Serving suggestions vary...Mom always served pasty with Heinz Chili Sauce on the side.  I've used that, ketchup, jalapeno relish, sriracha sauce (Huy Fong brand) and beef gravy.   Use your imagination!

Here are the basic ingredients for the filling:

1 lb hamburger
1/2 rutabaga, diced small (or use 2 small to medium sized potatoes)
2 stalks celery, chopped
1 large or 2 small carrots, diced
1 medium onion, diced
2-3 cloves garlic, diced
1 egg, whisked and beaten.
Garlic salt, Pepper
Few dashes Worcestershire

Mix all ingredients by hand in a large bowl, season to taste.  Prepare pie crust (recipe below), place meat in bottom crust, cover with top crust, pinch seams and vent the top.  Bake in 350 oven for 1.5 hours with a cookie sheet underneath to catch any juices that might come up through the vents.  If making individual pasties, bake for 1 hour.

Crust:

2 cups Flour
1/3 cup Olive Oil
1 teaspoon salt
Buttermilk

Mix first three ingredients in a bowl with a fork.  Add buttermilk a little at a time (start with 1/8 cup) and mix til the mixture is just between wanting to form crumbles and wanting to form a ball.   Don't get it too moist.   Divide in half, roll out first half on counter til it's a bit larger than the size of your pie pan.  Fold in half, grease your pie pan, lay the folded crust over one half of the pie pan and unfold.  Press and stretch and form into bottom of pan and up sides til covered.   Roll out the other half of the crust dough, fold and place in the same manner over top of meat after it has been added, unfold and pinch halves together, cut vents.

Wednesday, September 17, 2014

Green Bay Style "Chili Johns" / "Real Chili" Chili


Chili comes in many varieties...about as diverse as the ethnic mixes of the regions that made each style famous.  One of the oldest and most unusual varieties is that which is known as "Green Bay" Chili or "Chili John" chili.  It predates the similar Cincinnati 5-way by a number of years and traces back to Lithuanian immigrant "Chili" John Isaac, who opened a restaurant in 1913 down by the docks of Green Bay, WI, hanging a simple sign out front that said, "Chili".

"Chili" John Isaac
Not only did John Isaac invent this style of spaghetti-meat sauce-beans on top chili, he also invented the Oyster Cracker, calling upon the Nabisco company for a cracker that would be sized more appropriately for adding to his chili.

Chili John's at one time had 3 locations...Green Bay, Beaver Dam, WI, and Burbank, CA.   All three are still in business, though not affiliated, and only the Green Bay one still serves the completely authentic John Isaac recipe.  (UPDATE:  As of 2024, there is no longer a Chili Johns in Green Bay, nor do they sell the sauce).  John Madden, legendary NFL coach and broadcaster, never missed a visit to Chili John's when he covered a Green Bay Packers game.  Fran Tarkenton also was known to have a bowl before playing the Packers at home.

So where does "Real Chili" come into the story?

According to the Real Chili website, Milwaukee's infamous chili restaurant was started by Francis Honish in 1931.   What the website doesn't tell you is that Francis Honish was a former cook at Chili John's in Green Bay.  Hmmm.   There was actually a bit of bad blood and a lawsuit or two over the issue way back when, but time seems to have quelled the implications of chili-theft.   Both chilis are very, very similar in style and taste.  Patrons today probably don't care about the politics involved, they're just glad that they can get a bowl of Green Bay Chili in Milwaukee or Green Bay!

I've eaten at Real Chili and all three of the no-longer-related Chili John's restaurants and no matter what variation you get, it's all good!   This is a close rendition of the original Chili John's chili, though the real recipe is still a secret.  

(2024 update: So secret that, of the dozen or so "Chili John" recipes on the Internet, NONE of them are 100 percent correct.  This is as close as I have come.  If anyone out there *has* the real recipe and cares to share it -- particularly now that in 2024, Green Bay's Chili Johns is no more, please do so! 

Until that day, which may never come, I give you this: )

You will need for the Meat Sauce:

1/2 lb. Beef Suet, rendered
2 medium onions, finely chopped
2 lbs hamburger browned
1 oz. unsweetened Baker's chocolate
3 T chili powder
1 T cayenne pepper (or less if you don't like it hot)
1.5 T garlic powder
1 T cumin
1 T paprika
1 bay leaf
3 tablespoons cider vinegar
3-4 chili peppers, ground finely
salt to taste
pepper to taste
2 T Johnny's French Dip Au Jus (comes in a little jug)

(10/08/2024 -updated - nutmeg, clove and allspice removed after several of those familiar with the real Chili John recipe said to omit them, some other amounts and ingredients changed.  It's as close as you'll get without the actual recipe!)

Render the suet in a large pan, remove whatever is left and cook onions until tender. Add the meat and cook, breaking it up with a wooden spoon. When meat is browned, add spices, chocolate, broth,  and vinegar, stirring to mix well. Bring to a boil, then turn heat to low and simmer uncovered for 1½ hours. It should start to thicken. It is best if refrigerated overnight and reheated the following day.

To serve, you will need:


Spaghetti noodles
Shredded cheddar cheese
Sour cream
Vinegar (I like British Malt Vinegar)
Chopped onions
Warmed kidney beans or chili beans
Franks Red Hot
Oyster crackers
Pickled jalapeno slices

Spoon some cooked spaghetti noodles into a bowl, spoon generous portion of meat sauce on top of that, with some beans, a handful of oyster crackers, and a dash of vinegar.   That's your basic Green Bay Chili.  In addition, you can add any combination of the above toppings to complete your Green Bay Chili experience.  Mmmm...hot, greasy, yummy Green Bay Chili!

Sunday, September 14, 2014

Mom's Chili


When I was growing up, every Saturday, September through April, Mom would make a big pot of chili in the morning.  It would always be gone by the end of the weekend.

Mom with one of her legendary
wild game pies
Mom's chili was what she called "Dodge County Chili", named after the area of Wisconsin where she grew up, but was really her own variation, a much more chili-like variation than what traditionally fit that name.

In Wisconsin, chili is (or was, before the Internet and cable tv cooking shows homogenized a lot of regional cooking) divided into two camps...that which is similar to what Mom made, and what's known as "Green Bay Chili" which will be covered in a future edition of this blog.

Mom's Chili was known far and wide by her friends and family as the best around.  She made it every year for the last day of Deer Hunting season and held an open house on the lake they live on for any and all hunters.  It was a perennial hit!

We lost my Mom to cancer earlier this year.  With the nip in the air now, my thoughts naturally turned to her chili, and I'm going to try to keep up the tradition of making a pot of it every Saturday.

I love chili -- all types and styles -- and though this may not be a true chili by those who make standards on such things, it will always be my favorite.  I hope you'll make a pot of this too and enjoy it as much as I have over all these years.  Thanks, Mom!


You'll need:

1 large can tomatoes (or frozen tomatoes, about a quart)
1 lb hamburger
1 can chili beans or kidney beans
3 stalks celery
1 onion
1 green pepper
2 jalapenos (optional)
1 T Cumin
3 T Chili Powder
Garlic Salt
1 T Beef Boullion powder
1 Quart Tomato Juice
1/2 cup elbow macaroni

Brown the hamburger, toss in the onion, diced, along with the celery and peppers, also diced.  When hamburger is browned and vegetables soft, season with garlic salt to taste, then add the beef boullion, stir in well til dissolved.  Then add the tomatoes, beans and the rest of the seasonings.  Simmer, season with garlic salt and more chili powder if necessary, add the noodles and the tomato juice.   Simmer 30 minutes, serve.